Personalmente conozco 3 herramientas que permiten generar PDF desde C# y me quedo con Winnovative por lo anterior dicho:
- https://sourceforge.net/projects/itextsharp/: es gratis. Tiene algo de documentación y ejemplos.
- http://wkhtmltopdf.org/: es gratis, muy poca documentación o ejemplos.
- http://www.winnovative-software.com/: es gratis y de pago. Tiene muchos ejemplos en MVC o Web Forms, soporte y documentación.
El tutorial fue probado con IE 11, Chrome 50.0.2661.102, FireFox 37.0.1.
Requisitos
- Tener la librería Winnovative HTML to PDF Converter Library v12.16, descargarla de http://www.winnovative-software.com/download.aspx. En mi caso bajé Winnovative HTML to PDF Converter Library Optimized for 64-bit ya que tanto los PC de los desarrolladores como servidores son de 64 bit.
- En mi caso usaré una versión comprada HTML to PDF Converter Redistributable License cuyo valor es de 1200 USD ya que permite instalarlo en N Servidores, incluyendo en PC de desarrolladores y en servidores de clientes. No es obligación tener la licencia para el ejemplo, lo que sí, saldrán tus PDF con la frase Winnovative PDF Tools Demo en la parte inferior:

- Para el ejemplo usaré Visual Studio 2013 con C#, MVC 4 y Framework 4.0

Paso a paso
Pasos generales
- Crear un proyecto MVC 4 usando C# con Framework 4.0.
- Vamos a instalar la librería Winnovative "a la antigua", es decir manualmente, ya que se puede instalar por NuGet. Descomprimir el archivo descargado WnvHtmlToPdf-v12.16-x64.zip, en la raíz del zip estarán estos tres archivos que son compatibles si usas al Framework 4.0: wnvhtmltopdf.dll, wnvinternal.dat y Help.chm.
- Si usas el Framework 2.0 debes copiar los 3 archivos de la carpeta NET_2.0 (wnvhtmltopdf.dll, wnvhtmltopdf.xml y wnvinternal.dat) al directorio bin de tu proyecto web. El XML contiene sólo la documentación de los fuentes.
- Si están con Framework 4.0. debes copiarlos a una nueva carpeta LIB. Preocúpate los archivos que no estén chequeados como "solo lectura".
- El archivo wnvhtmltopdf.dll dentro de LIB debes referenciarlo desde tu proyecto MVC .NET.

- Agregar en el HomeController el using:
//HomeController.cs
using Winnovative; - Si usas la Key, y la agregas en el código, no se verá el mensaje "Winnovative PDF Tools Demo":
//HomeController.cs
htmlToPdfConverter.LicenseKey = "keyComprada";

Imprimir a pdf una vista o página externa
- Crear el vista principal con un botón dentro de un Form que llamará a la impresión, por ejemplo:
<!-- Index.cshtml -->
@using (Html.BeginForm("ImprimeVistaExterna", "Home", FormMethod.Post))
{
<input type="submit" id="impresion2" name="impresion2" value="imprimir otra vista completa" /gt;
}
- Creas el Action y la Vista Externa a ser llamada. Esta vista puede tener imágenes, o un llamado Ajax a otra Vista ¡y todo eso se verá impreso!. Esa es la gracia de la librería ya que mucha no hacen eso, esta ejecuta el request con todo lo que conlleva, llamados Ajax, JS, estilos, imágenes y todo el resultado del HTML final, es el que imprime. En mi caso incluso uso la librería Kendo MVC para mostrar un TreView y esta igual se imprime:
<!-- VistaExterna.cshtml -->
@{
ViewBag.Title = "Impresion ejemplo";
}
<h1>Vista demo de impresión</h1>
@(Html.Kendo().TreeView()
.Name("LinksTreeView")
.Items(items =>
{
items.Add()
.Text("Home")
.Action("Index", "Home");
items.Add()
.Text("About")
.Action("About", "Home");
items.Add()
.Text("Contact")
.Action("Contact", "Home");
})
)
<img src="~/Images/pacman.png" />
<div id="contenedor"></div>
<script>
$(document).ready(function () {
$.ajax({
url: "/Home/VistaExternaAjax",
type: 'GET',
datatype: 'html',
success: function (data) {
$("#contenedor").html(data);
}
});
});
</script> - Por último creamos la vista externa (la más externa) que es llamada desde al Ajax anterior:
<!-- VistaExternaAjax.cshtml -->
<h1>Otra Vista externa invocada por ajax</h1> <h2>holaaa</h2> - Si abrimos la Vista externa en el navegador se verá así:

- Creas el Action ImprimeVistaExterna dentro del controlador Home:
//HomeController.cs [HttpPost] public ActionResult ImprimeVistaExterna() { // Create a HTML to PDF converter object with default settings HtmlToPdfConverter htmlToPdfConverter = new HtmlToPdfConverter(); // Set HTML Viewer width in pixels which is the equivalent in converter of the browser window width htmlToPdfConverter.HtmlViewerWidth = 1024; htmlToPdfConverter.LicenseKey = "tuKey"; //propiedad opcional htmlToPdfConverter.HtmlViewerHeight = 768; // Set PDF page size which can be a predefined size like A4 or a custom size in points // Leave it not set to have a default A4 PDF page htmlToPdfConverter.PdfDocumentOptions.PdfPageSize = PdfPageSize.Letter; // Set PDF page orientation to Portrait or Landscape // Leave it not set to have a default Portrait orientation for PDF page htmlToPdfConverter.PdfDocumentOptions.PdfPageOrientation = PdfPageOrientation.Portrait; // Set the maximum time in seconds to wait for HTML page to be loaded // Leave it not set for a default 60 seconds maximum wait time htmlToPdfConverter.NavigationTimeout = 4; // Set an adddional delay in seconds to wait for JavaScript or AJAX calls after page load completed // Set this property to 0 if you don't need to wait for such asynchcronous operations to finish htmlToPdfConverter.ConversionDelay = 1; string url = "http://localhost:50422/Home/VistaExterna"; // Convert the HTML page given by an URL to a PDF document in a memory buffer byte[] outPdfBuffer = htmlToPdfConverter.ConvertUrl(url); // Send the PDF file to browser FileResult fileResult = new FileContentResult(outPdfBuffer, "application/pdf"); fileResult.FileDownloadName = "ImpresionVistaExterna.pdf"; return fileResult; } - Notar que en url defines la ruta que se imprimirá. Se le hará un request a dicha ruta. Puede ser cualquier URL, incluso una externa como www.google.com
- Con htmlToPdfConverter.NavigationTimeout se define el tiempo máximo de espera a dicho request. Yo usaré 4 segundos.
- Con fileResult.FileDownloadName le defines el nombre del archivo PDF de salida.
- Con htmlToPdfConverter.PdfDocumentOptions.PdfPageSize = PdfPageSize.Letter defines el tipo de papel, en este caso tipo Carta.
- Con htmlToPdfConverter.PdfDocumentOptions.PdfPageOrientation = PdfPageOrientation.Portrait defines la orientación del documento.
- Al hacer clic en "Imprimir página Externa", se bajará el PDF resultante y su lo abres es el mismo contenido HTML que tiene la vista externa:


Imprimir a pdf una sección de la página actual
- La sección debe ser una Vista Parcial, así que creas la vista Seccion.cshtml:
<!-- Seccion.cshtml -->
@{
ViewBag.Title = "Seccion ejemplo";
var nombre = ViewBag.Nombre;
}
<div class="panel">
<div class="panel-body">
@using (Html.BeginForm("ImpresionSeccionVistaActual", "Home", FormMethod.Post))
{
<h3>Sección: @nombre</h3>
<br />
<img src="~/Images/pacman.png" />
}
<center>
<div class="rotate">Este texto está rotado 90 grados</div>
</center> </div> </div> - El ejemplo contiene un texto rotado en 90 grados que se verá impreso de igual forma, por lo tanto debes agregar en la sección de estilos el siguiente código:
<!-- _Layout.cshtml -->
<style>
.rotate {
font-family: Arial, Helvetica, sans-serif;
font-size: 13px;
-webkit-transform: rotate(-90deg);
-moz-transform: rotate(-90deg);
-o-transform: rotate(-90deg);
-ms-transform: rotate(-90deg);
-sand-transform: rotate(90deg);
}
</style> - Creamos en la vista principal un botón Imprimir que llame al Action que haremos luego. Notar que agregamos dos bloques de texto antes y después para que se vea que solo se imprimirá la vista Seccion.cshtml:
<!-- Index.cshtml -->
<h2>Texto anterior</h2>
@{
Html.RenderAction("Seccion", "Home", new { nombre = nombre });
}
@using (Html.BeginForm("ImpresionSeccionVistaActual", "Home", FormMethod.Post))
{
@Html.Hidden("nombre", (object)nombre)
<input type="submit" id="impresion2" name="impresion2" value="imprimir sólo sección" />
}
<h2>Texto posterior</h2> - En el HomeController crear el Action ImpresionSeccionVistaActual que procesa la sección:
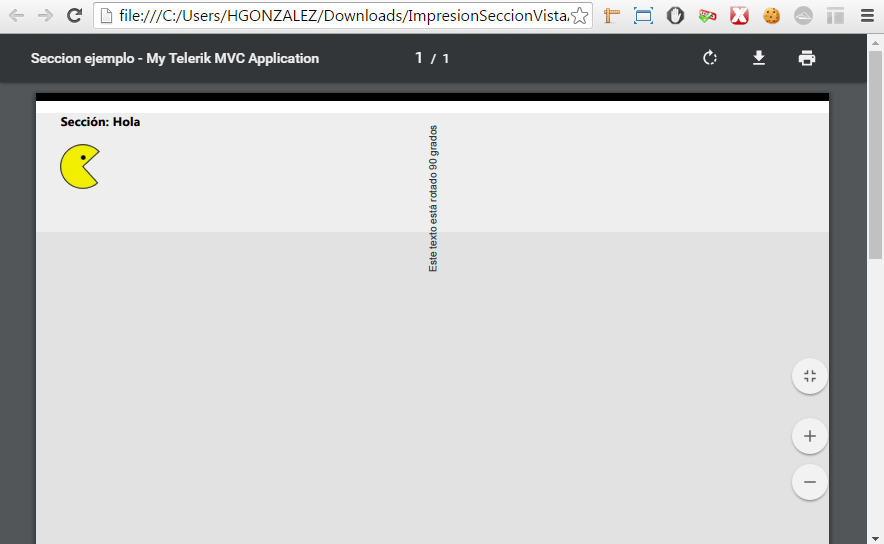
//HomeController.cs [HttpPost] public ActionResult ImpresionSeccionVistaActual(FormCollection collection) { object model = null; ViewDataDictionary viewData = new ViewDataDictionary(model); // transmit the posted data to view viewData.Add("nombre", collection["nombre"]); // The string writer where to render the HTML code of the view StringWriter stringWriter = new StringWriter(); // Render the Index view in a HTML string ViewEngineResult viewResult = ViewEngines.Engines.FindView(ControllerContext, "Seccion", null); ViewContext viewContext = new ViewContext( ControllerContext, viewResult.View, viewData, new TempDataDictionary(), stringWriter ); viewResult.View.Render(viewContext, stringWriter); // Get the view HTML string string htmlToConvert = stringWriter.ToString(); // Get the base URL String currentPageUrl = this.ControllerContext.HttpContext.Request.Url.AbsoluteUri; String baseUrl = currentPageUrl.Substring(0, currentPageUrl.Length - "Home/Seccion".Length); // Create a HTML to PDF converter object with default settings HtmlToPdfConverter htmlToPdfConverter = new HtmlToPdfConverter(); // Set license key received after purchase to use the converter in licensed mode // Leave it not set to use the converter in demo mode htmlToPdfConverter.LicenseKey = key; // Set an adddional delay in seconds to wait for JavaScript or AJAX calls after page load completed // Set this property to 0 if you don't need to wait for such asynchcronous operations to finish htmlToPdfConverter.ConversionDelay = 2; // Convert the HTML string to a PDF document in a memory buffer byte[] outPdfBuffer = htmlToPdfConverter.ConvertHtml(htmlToConvert, baseUrl); // Send the PDF file to browser FileResult fileResult = new FileContentResult(outPdfBuffer, "application/pdf"); fileResult.FileDownloadName = "ImpresionSeccionVistaActual.pdf"; return fileResult; } - Si haces clic en "Imprimir solo sección", se verá el PDF:

- La imagen de la aplicación final ejecutándose en el navegador con dos botones, Imprimir Sección o Imprimir página externa, se ve así:


Mostrar PDF en una nueva pestaña del navegador al hacer clic en imprimir (y no en la barra de descargas)
Cambiar la clase Controller:
//HomeController.cs
// Convert the HTML page given by an URL to a PDF document in a memory buffer
byte[] outPdfBuffer = htmlToPdfConverter.ConvertUrl(url);

// Send the PDF file to browser
//FileResult fileResult = new FileContentResult(outPdfBuffer, "application/pdf");
//fileResult.FileDownloadName = "ImpresionVistaExterna.pdf";
//return fileResult;

MemoryStream stream = new MemoryStream(outPdfBuffer);
Response.AppendHeader("content-disposition", "inline; filename=file.pdf");
return new FileStreamResult(stream, "application/pdf");
Cambiar la vista para que abra en una nueva pestaña con target _black:
<!-- Index.cshtml -->
@using (Html.BeginForm("ImprimeVistaExterna", "Home", FormMethod.Post, new { target= "_blank" }))
{
<input type="submit" id="impresion2" name="impresion2" value="ver pdf generado directo en otra pestaña" />
}

Mostrar PDF en una nueva pestaña del navegador al hacer clic en imprimir y se abra automáticamente el cuadro de diálogos de las impresoras
Esto es útil si el usuario quiere hacer la menor cantidad posible de clic para imprimir un documento PDF. Se le debe asignar el key (si tienes) de nuevo al Document. Recordar igual lo del target _blank en la vista que tiene el botón.
//HomeController.cs
string url = "http://localhost:50422/Home/VistaExterna";

// Convert the HTML page given by an URL to a PDF document in a memory buffer
byte[] outPdfBuffer = htmlToPdfConverter.ConvertUrl(url);

//mergeResultPdfDocument.OpenAction.Action = New PdfActionJavaScript("print()")

// Send the PDF file to browser
//FileResult fileResult = new FileContentResult(outPdfBuffer, "application/pdf");
//fileResult.FileDownloadName = "ImpresionVistaExterna.pdf";
//return fileResult;

MemoryStream stream = new MemoryStream(outPdfBuffer);

Document document = new Document(stream);
document.LicenseKey = key;
document.OpenAction.Action = new PdfActionJavaScript("print()");
byte[] b = document.Save();
Stream strm = new MemoryStream(b);

Response.AppendHeader("content-disposition", "inline; filename=file.pdf");
return new FileStreamResult(strm, "application/pdf");
